Tuesday, 29 November 2011

Rubi Dutch Spiral Necklace

la..la...la..la....la...  oh I am sooo happy...I have completed a Dutch Spiral stitch necklace! 


With the choice of beads that I have chosen, the piece looks entirely different from the book, but I like it.  The lacy and scallop look surprised me as I was stitching along.  


After a few round of the lacy portion, I was facing the problem of finding ways to change the stitch to a more simple and slimmer rope.  I almost wanted to take the suggestion to end the spiral and change to stringing - an easier way out.  However, I gave myself one last chance to figure out the transitional stitch and I succeeded. The most difficult part was reversing the sequence of the spiral stitch at one side of the necklace.  I had to keep a very clear mind not to get confuse with the stitch of the other side as I was working on both ends at the same time alternately! That's pure madness!

Now it is time to bid farewell to Rubi.  I had promised a friend to make for her a red and black necklace and I have selfishly kept the first one that I have made - Fury Cellini Spiral.


I am not sad about this because I am going to make another one.  This time, with the colors that I like. Yeah! 

Sunday, 20 November 2011

Fury Cellini Spiral Necklace

The ugly duckling has grown into a beaUtiful (a-hem) sssswan....err..necklace! 


Now that it is completed with a acceptable result, it is confession time:  I chickened out of continuing with the stitch using various size beads because it was not easy!  

It took me two days to come out with this easier way  - reduce to single bead size,  gradually reduce the red bead from two rows to one row and finally to random speckles.  I toned down the red with more black as I worried it may look too fierce.

I ended the necklace with beaded clasp and loop to complement the necklace.  A metal toggle set may mar the beauty of the fully beaded necklace.  I also have 'upgraded' my skill for making beaded clasp and loop:


Instead of using a beaded ball made by rows of beads covering a core bead with link and loop formed by single row of beads , the clasp in this Cellini Spiral necklace is a peyote toggle tube (decorated with red bicone beads at both ends)  with the loop and toggle link formed by three-row peyote stitch.

This necklace was made with a dear friend in mind.  After spending hours of work creating it, I find it hard to part with it.  It is like a mother not willing to give up her baby for adoption.

I am keeping it!!!


Sunday, 13 November 2011

Cellini Spiral Rope - Trial Piece

Yes, I have finally braved up and have a go with a Cellini Spiral stitch.  In order to see a dramatic effect of the spiral, I used different size, shape and color beads in this trial piece: 

This 7.5cm work-in-process took me about 10 hours over three days to do!!! The progress was pretty slow because there were a few undoings along the way.  It was quite frustrating when missing stitches were discovered and undoings were necessary in order to proceed.  Oh well, I guess this is part and parcel of seed beading.  ENDURANCE, ENDURANCE!

The order of beads: 2mm black bicone, 2mm black bugle, size 12 gold, size 12 red X 2, size 15 metallic black, size 12 red, size 12 gold and 2mm black bugle.  Total 9 beads in a round.

There is inconsistency in the spiral.  Probably due to poor quality beads which are not uniform in size and shape.  The stitch tension was also not equal through out.  

Ah-hem, but don't you think this is considered 'not bad' for a first timer? 

I am not sure if I should continue the spiral.  I am thinking of gradually reduce the rope thickness by changing all to size 11 beads first.  After a few round, reduce further by cutting the number of beads per round by half.  Hmm....perhaps I'll try that out and see if it works.  


Tuesday, 8 November 2011

Modified Amethyst Necklace

It's done! The problematic Amethyst Necklace mentioned in 9/9/2011 posting is now being modified:


Needless to say, the one on the left is the modified version.  I have redistributed the weight of the shorter/inner chain by rearranging the gemstones position.  The chain now drops nicely within the loop formed by the longer chain so the whole necklace has a more 'balanced' look.

Mission accomplished with no more backlog!  I can now move on to Seed Beading, yeah!

Sunday, 6 November 2011

Smoky Quartz Necklace

Ok, now I am back to beading after a long break.

I am very determined to try my hands on Seed Beading - a more challenging craft to me as it involves tiny beads (challenging my eyes) and detailed stitching (challenging my patience).  But I must first clear the backlog so that I can focus on the new challenge.  

The first is to modify a Smoky Quartz necklace (forgot to take a 'before picture' for comparison) which I have made few months ago.  

The original one was too short with the last stones at two ends resting on my collar bones - ugly!  I have now lengthened it with two end caps and also lengthened the chain after the end caps.  The result is a short necklace instead of choker:


The end caps have also given the necklace a more 'finished' look.  I am happy with the result.

ps. A friend has suggested to add red color beads instead of the end caps to add interest to the almost monotone necklace.  Sorry pal, I am a purist so I will stick to the original color tone. 

Thursday, 3 November 2011

Back and Recharged!

I am back from the 18 days vacation - exhausted after twenty over hours of flight.  Recharged? Yes, with the two full day rest after the vacation!

The National Parks were beautiful.  The photos which I took with my little camera simply could not capture the actual beauty of the scenery:


These were taken from the Petrified Forest, Painted Desert, Grand Canyon and Yellowstone Park. 

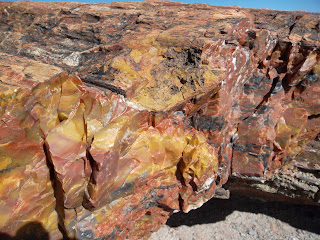
Oh, I nearly forgotten to post the photos of petrified wood:


They are amazingly beautiful, aren't they?  And I did not pocket any of them though tempted. (pat on the back)


Wednesday, 12 October 2011

Herringbone rope, first attempt failed!

Back from one week vacation in Malaysia!!!  From historical town of Malacca...

to capital city of Kuala Lumpur...

to food-paradise Penang... 

to hill resort Cameron Highlands...
 
The food though did not look appealing, they were yummy!!!  However, good food, nice scenery and good company failed to dominate my mind - the unfinished Herringbone rope project kept bugging me through out the whole trip.

The fact that I am writing this post now, needless to say, the project is DONE! - one evening and half a day's work! Ta-da: 


This is a far cry from the photo shown on the post dated 27 September - well, at least to my standard.  I had no idea then as to how it will look like, how it should end and what material to use for the bail.  All these problems were resolved impromptu.

When the hollow rope was completed, the color was a bit too light for the pendant.  I inserted a black rubber cord through it to darken the grey and the cord sticking out at the ends prompted me to string the metal findings and red glass bead to complete the look.

As I have not learnt to make more sophisticated wire bail that matches the pendant, I decided to used the same seed beads to weave the bail.  I used  BRICK STITCH for this simple bail.

How do I grade it? Failed!!!  The tension is not even - some parts are too tight thus produced a kinky effect at those parts.  The beads used are not uniform so it does not get the neat chevron look. Hmm...I shall practice more on this stitch to perfect it......with beads of uniform size and shape.

Now that there is no outstanding project, I shall enjoy my vacation in the US which is from 14 Oct to 31 Oct.  Yeah!


(so no posting until Nov)